

GRAVITY PERKS POST CONTENT MERGE TAGS
What does it do?
GP Post Content Merge Tags provides the ability to include Gravity Forms merge tags in your WordPress post content. The uses are endless but here are a few of the most common.
GRAVITY PERKS POST CONTENT MERGE TAGS
- Reclaim complete control over the styling of the redirect page while maintaining the ability to use Gravity Forms merge tags in the content of the page.
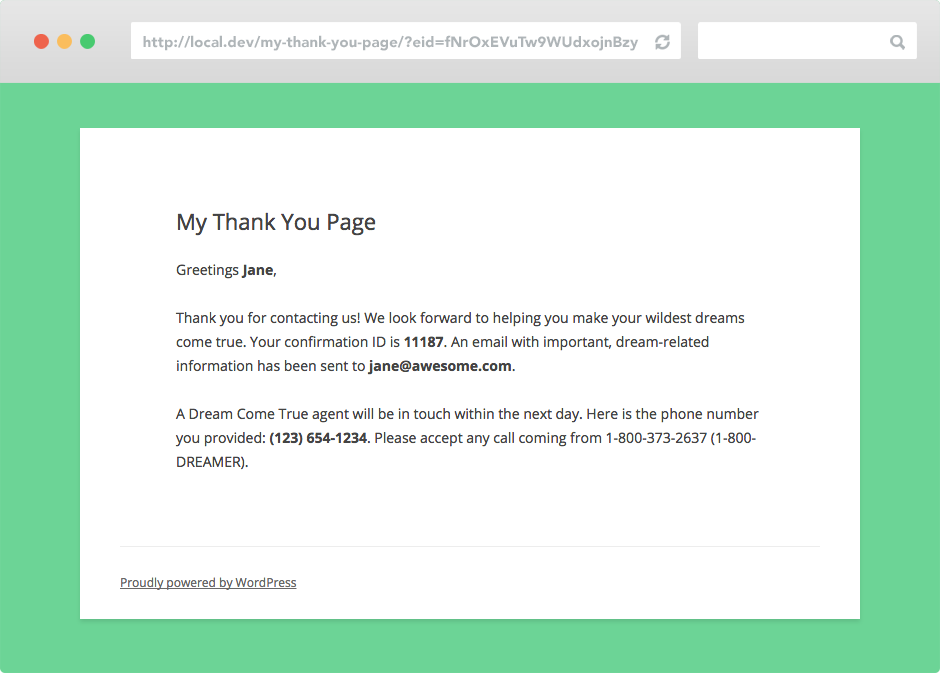
- Reuse the same confirmation page for multiple forms. For instance, you might have 25 forms on your site but would like to redirect users from all of those forms to a single, personalized “Thank You” page on submission.
- Implement persistent confirmation pages. For example, you could send the user an email including the confirmation page URL to their form submission, which they could save for future reference.
GRAVITY PERKS POST CONTENT MERGE TAGS
Features
- All Gravity Forms Merge Tags Supported
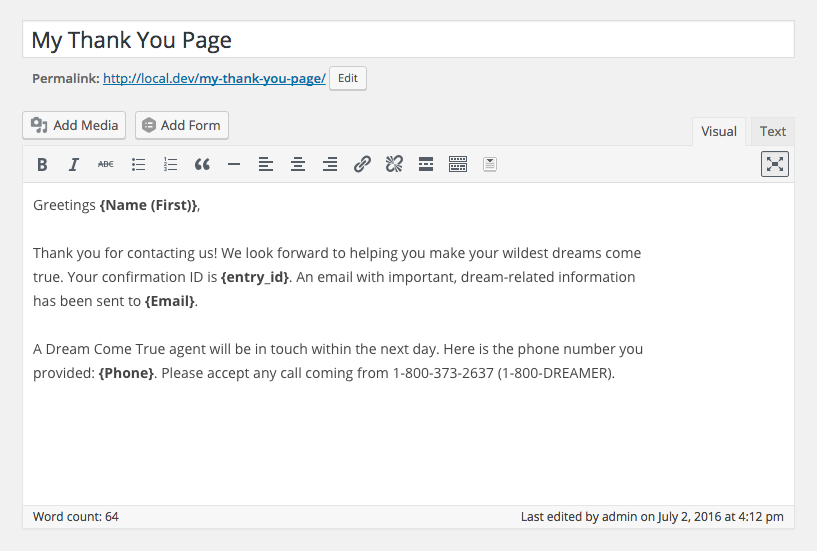
Works with all default Gravity Forms merge tags out of the box. - Merge Tag Button on Post Editor
Awesome new Merge Tag Button right in the Post Editor toolbar to allow you to quickly insert the merge tags you want directly into your post content. - All Custom Post Types Supported
Merge tags can be used with any post type. - Global Merge Tags
Use simplified global merge tags to match fields across multiple forms. - Handy
[eid] Shortcode
Display entry data anywhere shortcodes are supported.
- Pretty Entry ID
Use {pretty_entry_id} to insert ID. A safe and pretty way to pass entry data. - Secure URLs
Confirmation page URLs are encrypted to protect your entry data. - Seamless, Easy-to-use UI
Integrates directly with the Gravity Forms confirmation settings. Activate functionality with a single click. - Automatic Updates
Get updates and latest features right in your dashboard. - Awesome Support
We’re here to help! And we mean it.
Documentation
How does this functionality work?
When a user submits your form, the entry ID will be encrypted and automatically appended to the confirmation URL. This encrypted entry ID will be used to retrieve the full entry and parse all merge tags in the confirmation page. GRAVITY PERKS POST CONTENT MERGE TAGS
How do I enable this functionality?
This plugin requires Gravity Forms 2.0 or greater. The following instructions assume you have Gravity Perks and GP Post Content Merge Tags installed and activated. GRAVITY PERKS POST CONTENT MERGE TAGS
-
Navigate to the Confirmations page for any form.
-
Select “Page” for the Confirmation Type setting and select your desired confirmation page from the “Page” setting.
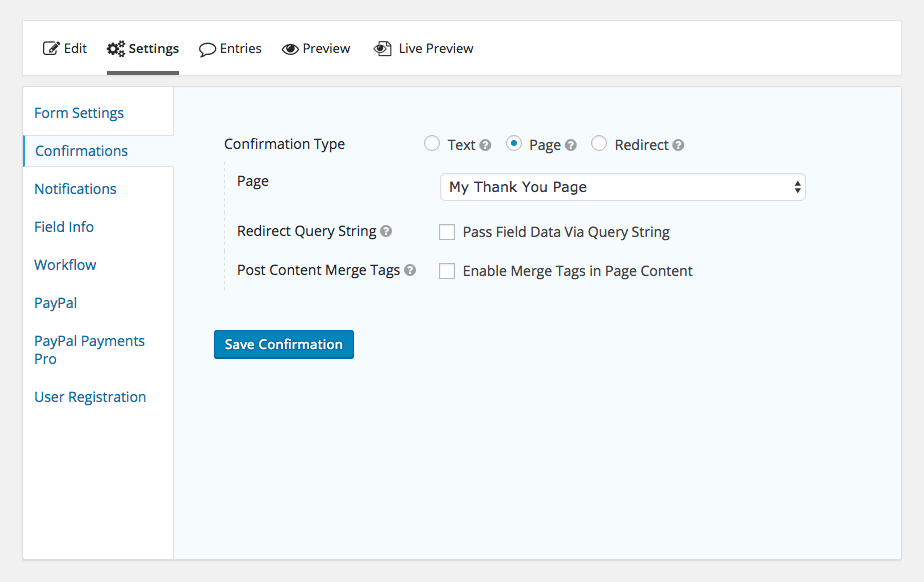
Note: You can use GP Post Content Merge Tags for the “Redirect” Confirmation Type as well; however, you will need to configure the URL manually. More details below. GRAVITY PERKS POST CONTENT MERGE TAGS
-
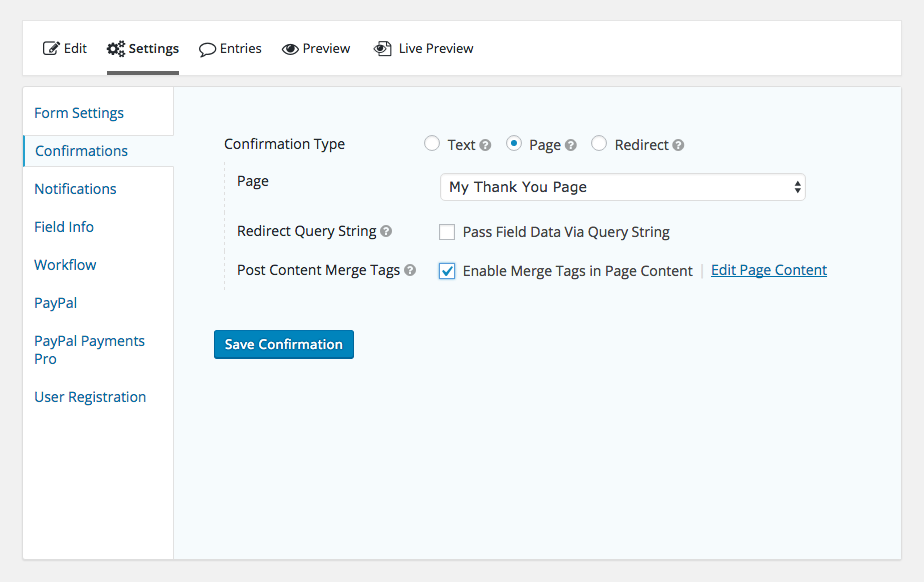
Click on the “Enable Merge Tags in Page Content” checkbox to enable merge tags for your selected confirmation page.
-
Click the “Save Confirmation” button to save your confirmation.
-
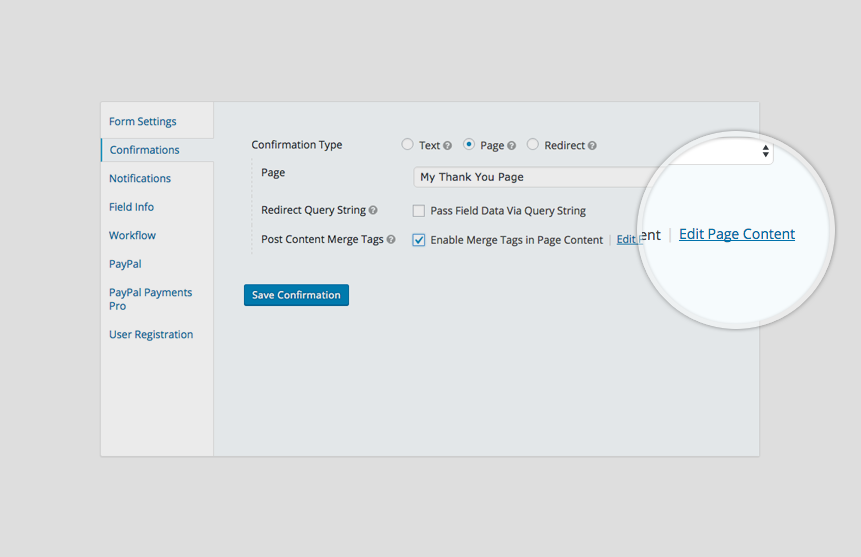
Click the “Edit Page Content” link that displays next to the “Enable Merge Tags in Page Content” to edit your confirmation page.
-
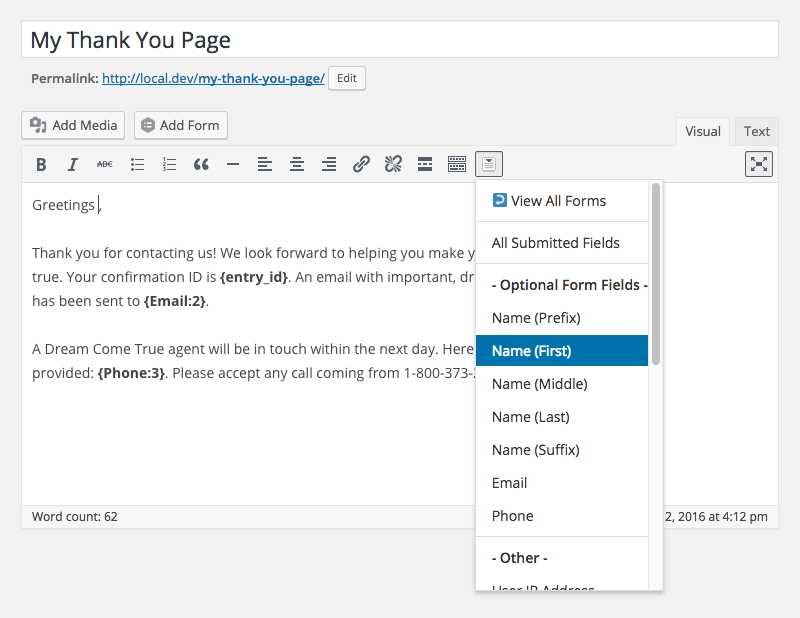
Select the Merge Tag Button to insert Gravity Forms merge tags into your post content.
Awesome! Now you’re ready to see it all in action. Go submit your form. When you’re redirected, you’ll notice that your encrypted entry ID has automatically been appended the redirect URL and all of the merge tags in your post content have been replaced with the entry data (which was just submitted). GRAVITY PERKS POST CONTENT MERGE TAGS
Feature Details
Merge Tag Button
When enabled, the Merge Tag Button will appear in the toolbar for the visual post content editor. To enable the Merge Tag Button, you must first activate Post Content Merge Tags for the post/page you for which you would like to insert merge tags. You can do this by selecting the page as the confirmation page for any form, enabling the “Post Content Merge Tags” setting, and then accessing the page via the “Edit Page Content” link that appears. GRAVITY PERKS POST CONTENT MERGE TAGS
By default, a list of merge tags will appear specific to the form from which you accessed the “Edit Page Content” link. If you would like to add merge tags from other forms, select the View All Forms menu item. This will refresh the menu with a list of all forms. Select your desired form and the menu will be refreshed with a list of merge tags specific to the selected form. GRAVITY PERKS POST CONTENT MERGE TAGS
Global Merge Tags
 Rollover to View Field Specific Merge Tags
By default, merge tags are field-specific. They are matched by the ID (i.e. {My Label:12}). Global merge tags allow merge tags to be matched based on the label. This means they can match fields from any form. GRAVITY PERKS POST CONTENT MERGE TAGS
With global merge tags, you can use the same confirmation page for multiple forms while still including personalized information for the submitting user via Gravity Forms merge tags. Read our How to create personalized confirmation pages for more details
The {encrypted_entry_id} Merge Tag
The {encrypted_entry_id} merge tag allows you to pass the entry ID to another location, without directly displaying the form’s entry ID.
Because of this merge tag, passing entry details over to other locations such as confirmation redirect destinations is a breeze. Simply passing the {encrypted_entry_id} tag within your confirmation settings allows you to dynamically pass the entry ID without the need for any custom configuration.
The {confirmation_url} Merge Tag
The {confirmation_url} merge tag allows you to output the confirmation URL that the user is sent to after submitting your form. By utilizing this merge tag, the confirmation URL is easily accessible at a later date, if needed.
The {pretty_entry_id} Merge Tag
Used in the same cases as {encrypted_entry_id}, the {pretty_entry_id} merge tag obfuscates the Entry ID for safety, but the resulting ID is shorter and readable than encryption.
Compare:
- Entry ID:
156 - Encrypted Entry ID:
2kG%2BuDJS7fpR0ypGiHIagVXYYKnEtN%2Bp1rYV5zODPHU%3D - Pretty Entry ID:
80d57d
To activate this feature, do the following.
- Go to the WordPress theme editor by selecting “Appearance” → “Editor”.
- Select
functions.phpfrom the list of files on the right. - Paste the following line to the end of the opened file.
add_filter( 'gppcmt_enable_pretty_id', '__return_true' ); - Save the file.
The [eid] Shortcode
GP Post Content Merge Tags relies on a special WordPress filter (the_content) that is applied to the post content before it is rendered.
You may want to use merge tags in content that is not processed through this filter. We’ve added the [eid] shortcode to help with these use-cases. Even if the content is not run through the content filter, it is very likely still parsed for shortcode.
In combination with the Shortcode Widget plugin, shortcodes can be placed within widget areas. Doing so will allow you to place Gravity Forms merge tags within sidebars of your site, or any other widget area available to you.
-
Basic Usage
[eid]Hello, {Name (First)} {Name (Last)}[/eid]Simply wrap your merge tag content within the
[eid] shortcode. The content will be parsed for merge tags when shortcodes are processed.
-
Field Attribute Usage
Hello, [eid field="1.3" /]Don’t feel like writing out the full merge tag and you know the field ID? You can specify the field ID via the field attribute.
-
Tag Attribute Usage
Hello, [eid tag="{Name (First)}" /]If you want your merge tag to be processed directly from within the shortcode, you can use the tag attribute.
-
Shortcode in HTML Attribute
[eid]<img src="http://mysite.com/images/{Product Type}.jpg" />[/eid]WordPress no longer supports shortcodes within HTML attributes. Just include the full HTML tag (along with the merge tag) and the [eid] shortcode will handle the rest.
Advanced Configuration
Parsing Merge Tags for “Redirect” Confirmation Type
GP Post Content Merge Tags supports all post types out of the box; however, Gravity Forms does not support selecting a post from a custom post type via the Confirmation UI. To activate Post Content Merge Tags for other post types, you will need to do the following.
- Select “Redirect” for Your Confirmation Type.
- Append “eid” Parameter to Your Query String.
- (optional) Activate Merge Tag Button.The merge tag button makes inserting merge tags in your post content so much easier. To activate for custom post types, you will need to append a “form_id” parameter to the query string of the edit page with your desired form ID. Once the button has been activated for a post, it will always be available for that post.Default Edit URL
http://local.dev/wp-admin/post.php?post=8043&action=editEdit URL with “form_id” Parameterhttp://local.dev/wp-admin/post.php?post=8043&action=edit&form_id=123
Global Usage
GP Post Content Merge Tags will attempt to parse merge tags in any content filtered through “the_content” filter. You can append aneidto any WordPress URL and the merge tags will be replaced where “the_content” filter is applied.
Hooks
Known Limitations
Merge Tags might not work when used on page built with a visual page builder plugin, in that case, you must use the
[eid]shortcode.
Related Articles
See How To Download