

WOOTHEMES HUB WOOCOMMERCE THEMES
Hub
Welcome to Hub! This theme includes a Business Page Template as well as support for the WooCommerce, Features, Testimonials and Our Team plugins!Note:This product has been retired and is not for sale. Documentation is no longer being updated.
Installing your Theme
To learn how to install your theme please reference our documentation here: Installing a Theme
Checking your theme version
You can confirm your theme and WooFramework version by going to: Hub > Framework
Activate your Theme Key
After you install your theme, be sure to activate your theme key by downloading and installing the WooCommerce Helper plugin. This verifies your site when contacting support and enables 2-click updates for quick theme upgrades down the road.
Updating your theme
It is important to ensure you have the latest version of your theme at all times. This is the best way to proactively troubleshoot issues on your site.Please reference the WooCommerce Helper Documentation to learn more.
WOOTHEMES HUB WOOCOMMERCE THEMES
Adding your Logo
You have two options when adding a logo to your site. You can either use a text based Site Title and optional Tagline or you can use an image based logo.
To enable the text based Site Title and Tagline:
- Go to: Settings > General to enter your site title and tagline.
- Go to: Hub > Settings > General Settings > Quick Start and check the box to enable the text based site title and tagline.
- Optionally Enable the site description and adjust the typography settings.
- Save All Changes.
To upload your own image based logo:
- Go to: Hub > Settings > General Settings > Quick Start > Custom Logo.
- Upload your logo image – we recommend using either a .jpg or .png for this.
- Save All Changes.
Configure the homepage
Homepage setup
As of Hub version 1.2.0+ in order to customize the display order of the homepage components, you must first download and install the Homepage Control plugin.
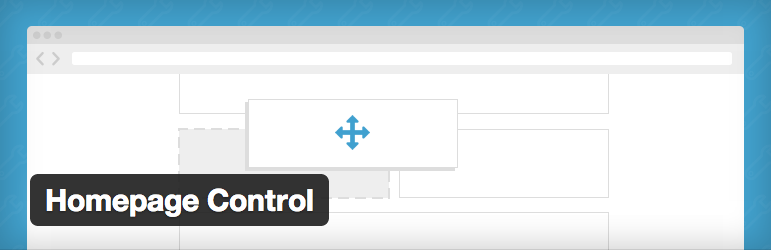
Please read the Homepage Control documentation to learn more about how to set this up.
With the Homepage Control plugin you can enable / disable the different content components:
- Introductory Message
- Popular Posts
- Testimonials (requires Testimonials plugin)
- Recent Posts
- Our Team (requires Our Team plugin)
Each of these components can then be configured further:
WOOTHEMES HUB WOOCOMMERCE THEMES
Intro section

To configure the introductory message on the homepage go to: Hub > Settings > Homepage > Introductory Message. Here you can add the heading, the message, the button label and the button destination.WOOTHEMES HUB WOOCOMMERCE THEMES

Popular Posts
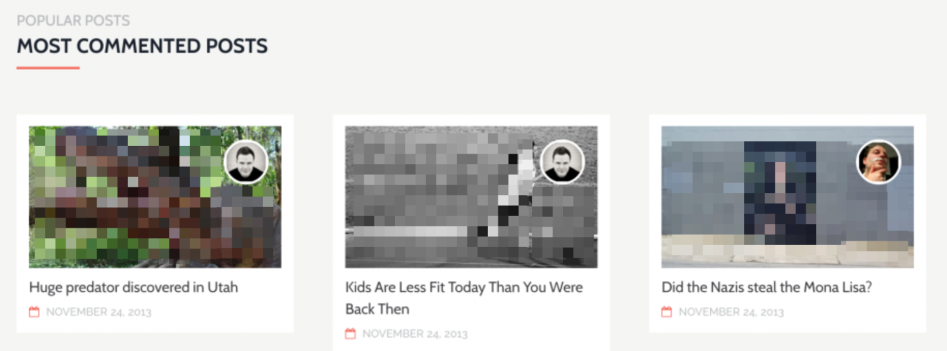
Popular posts are defined by the number of comments a post has.
Go to: Hub > Settings > Homepage > Popular Posts to configure the section title, byline, period of time and number of posts.
The period of time specifies how far to look into the past for popular posts.

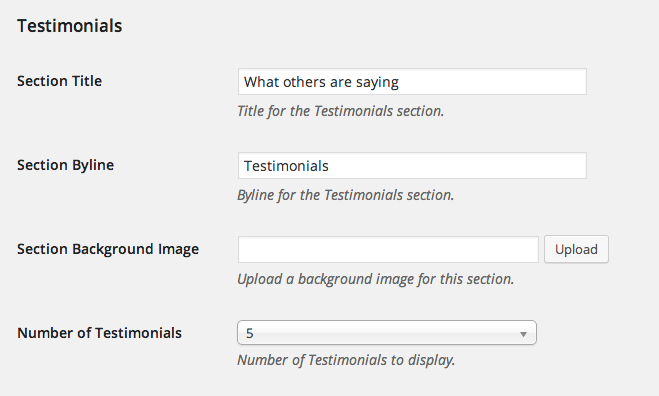
Testimonials
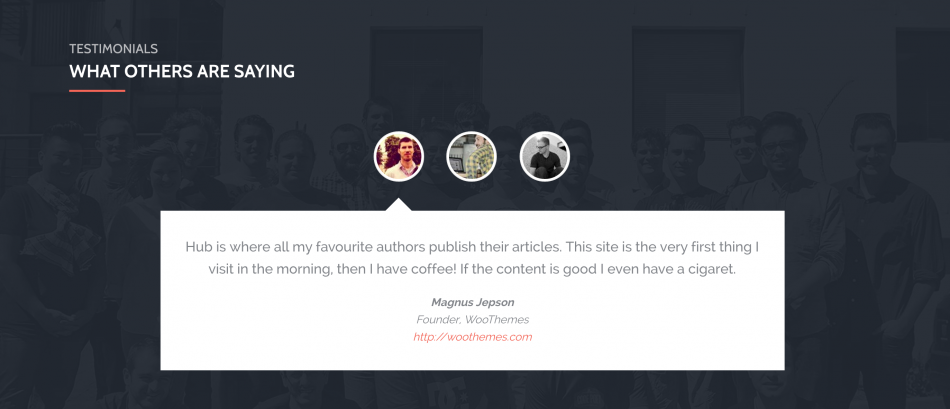
To learn how to setup Testimonials please see the documentation here: Testimonials Documentation
To configure the Homepage Testimonials settings go to: Hub > Settings > Homepage > Testimonials. Here you can specify a title, byline, optional background image and number of testimonials to display. The number you set to display will display the ‘x’ most recently published testimonials.WOOTHEMES HUB WOOCOMMERCE THEMES
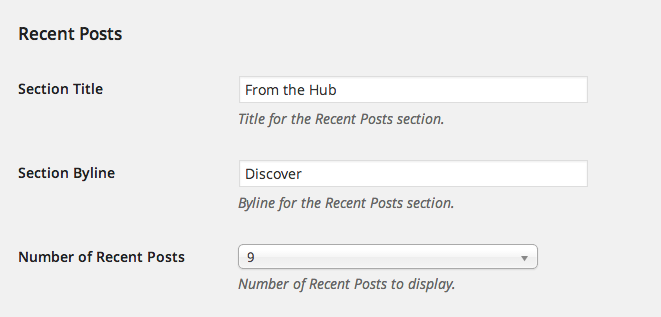
Recent Posts

To configure the Homepage Recent Posts settings go to: Hub > Settings > Homepage > Recent Posts. Here you can specify a title, byline and the number of posts to display. Posts will display ‘x’ most recently published posts.WOOTHEMES HUB WOOCOMMERCE THEMES
Our Team

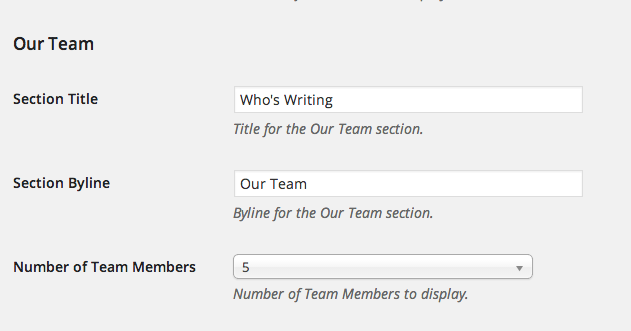
To learn how to setup Our Team plugin please see the documentation here: Our Team Documentation
To configure the Homepage Our Team settings go to: Hub > Settings > Homepage > Our Team. Here you can specify a title, byline and the number of team members to display.
WooCommerce Theme Options
If you would like to setup a WooCommerce shop, you must first download and install WooCommerce.
After installing, to configure the WooCommerce Theme Options go to: Hub > Settings > WooCommerce to configure the following options:
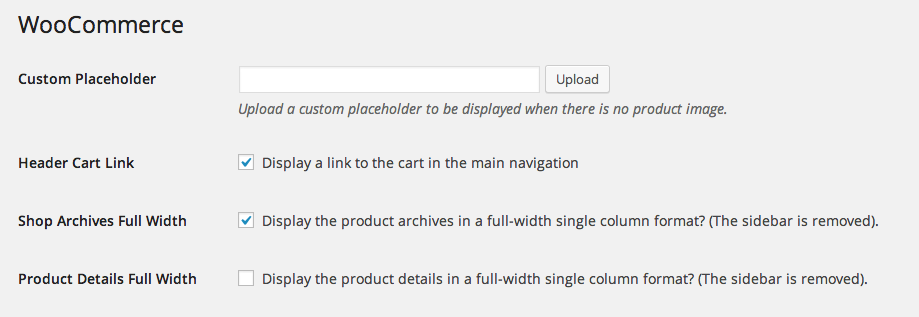
- Upload a Custom Placeholder to be displayed when there is no product image.
- Header Cart Link to be displayed in the main navigation.
- Shop Archive Full Width – Specify whether to display product archives full width
- Product Details Full Width – Specify whether to display all product details pages full width, removing the sidebar.
Business Page Template
Hub comes with a useful Business Page Template to help display additional content on your site, including support for the WooSlider Features and Testimonials plugins. You must purchase the WooSlider plugin separately in order to use it on the Business Page Template.WOOTHEMES HUB WOOCOMMERCE THEMES
Go to: Hub > Settings > Layout > Business Template to select the business page modules you would like to display.
To set the business page template:
- Go to: Pages > Add New.
- Add a title and the page content.
- Go to: Page Attributes > Template just below the publish module to select the Business page template.
- Publish the page.
Setting the Business Page Template as the Homepage
To set the Business Page Template as your Homepage go to: Settings > Reading > Front Page Displays and select the Static Page > Front Page as your newly created Business Page (instead of the recent posts setting).Please note! By manually setting a static front page in the Reading settings you will be disabling the Homepage widgetized area and the Homepage Theme Option settings. You must have ‘Recent Posts’ set as the homepage if you want to use the Widgetized Homepage.WOOTHEMES HUB WOOCOMMERCE THEMES
To learn more about how Templates please see our video tutorial here: Page Templates
Including WooSlider in the Business Page Template
The Business Page Template slider uses the WooSlider – Attached Images slideshow type. After you have purchased, downloaded, installed and activated the WooSlider to include the slider on your business page template:
- Go to: Hub > Settings > Layout > Business Template to select Display WooSlider.
- Next, go to: Pages > Edit to add images to your newly created business page.
- Select Add Media.
- Upload as many images as you’d like. Each image will create 1 new slide.
- Close (X) the Media Uploader pop-up window.
- Finally, save changes by selecting Update.
Please note: You must upload images directly to your business page template in order for the Business Page Template WooSlider feature to show.Pro Tip! in the new WordPress 3.5+ Media Uploader you can select Uploaded to this Page from the dropdown to only view the images uploaded to this page and thus used in the featured slider (see below). Drag and drop the images from here to reorder if you’d like.WOOTHEMES HUB WOOCOMMERCE THEMES
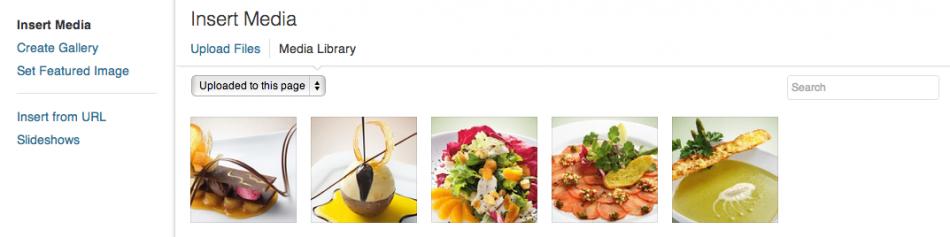
Image Dimensions
Here are the ideal image dimension to use for Hub. Larger images will be dynamically resized to fit, while smaller images will be stretched larger to fit. Product images will scale width and height and will not be cropped into a square (unless you use the ‘Hard Crop’ setting found in WooCommerce > Settings > Product > Product Image Options). For greatest control of your image sizes, it is best to save out your images to the exact size before uploading.Please note! We do not recommend that you force the height of your slider or product images with CSS as this will break the responsiveness of the theme images. Rather, it is best to save out your slider/product images with the same height before uploading.WOOTHEMES HUB WOOCOMMERCE THEMES
Recommended Image Sizes
- Featured blog image suggested minimum width: 825px
- Testimonials Homepage Background image suggested minimum width: 1600px
- Our Team featured image suggested minimum width: 355px
- WooSlider Business Slider suggested minimum width: 1200px – height will scale to fit
Featured Blog Images
To set the Featured Blog Image size for Thumbnails and the Single Post image go to: Hub > Settings > Dynamic Images > Thumbnail Settings.
If you would like to have your featured blog images the same as the Hub demo go to: Hub > Settings > Dynamic Images > Thumbnail Settings to enter the following Thumbnail Settings:
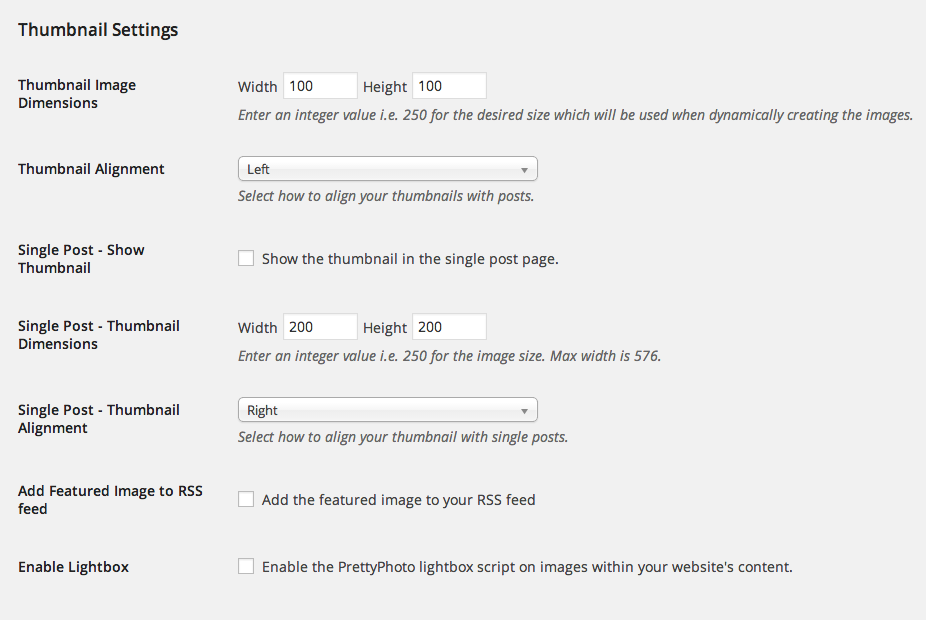
- Thumbnail Image Dimensions: 825px x 350px
- Single Post – Thumbnail Dimensions: 825px x 350px
To learn more about Featured Images please see our tutorial here: Featured Images
WooCommerce Product Images
To adjust the Shop Image settings go to WooCommerce > Settings > Product > Product Image Options; scroll to the bottom of the page to find image size settings. If you change these settings after you’ve uploaded images, you must Regenerate Thumbnails for the changes to take effect.Due to the product layout on archive shop pages, square product images work best. This can be achieved by using the WooCommerce Hard Crop feature and setting the same pixel dimension for both the width and the height.WOOTHEMES HUB WOOCOMMERCE THEMES
Here are the WooCommerce image size settings from the demo:
- Catalog Images: 388px x 388px
- Single Product Images: 365px x 365px
- Product Thumbnails: 112px x 112px
To learn more about WooCommerce product images please see further documentation here: Adding Product Images and Galleries and here Using the Appropriate Product Image DimensionsIf you want to support HiDPI (retina) screens then you should double all of the aforementioned dimension values.WOOTHEMES HUB WOOCOMMERCE THEMES
Subscribe & Connect
The Subscribe & Connect functionality for the Hub theme can be used on single post pages, with the Subscribe & Connect widget, as well as a special Subscribe & Connect area above the footer region.
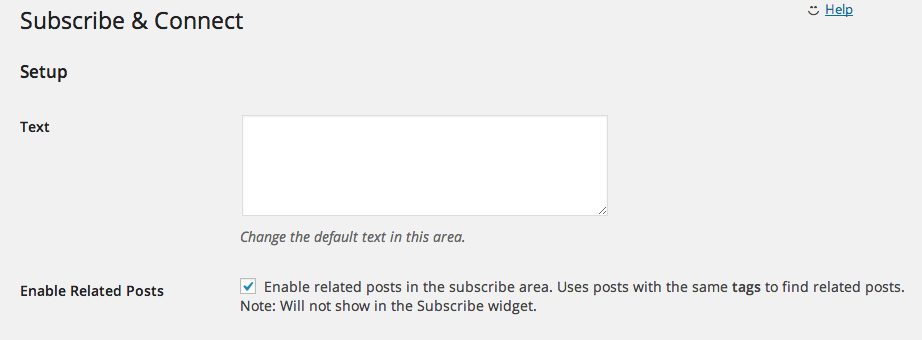
To add social media icons to your single posts page go to: Hub > Settings > Subscribe & Connect > Setup and select Enable Subscribe & Connect – Single Post.

To setup Subscribe & Connect go to:
- Subscribe & Connect > Connect Settings to link the icons to each social media page.
- Subscribe & Connect > Setup to enable the related posts in the Subscribe & Connect box (example below).
- Subscribe & Connect > Subscribe Settings to setup the email subscription form.
- Hub > Theme Options > General Settings > Subscription Settings to enter your preferred RSS feed URL.
Contact Page
To setup a Contact Page:

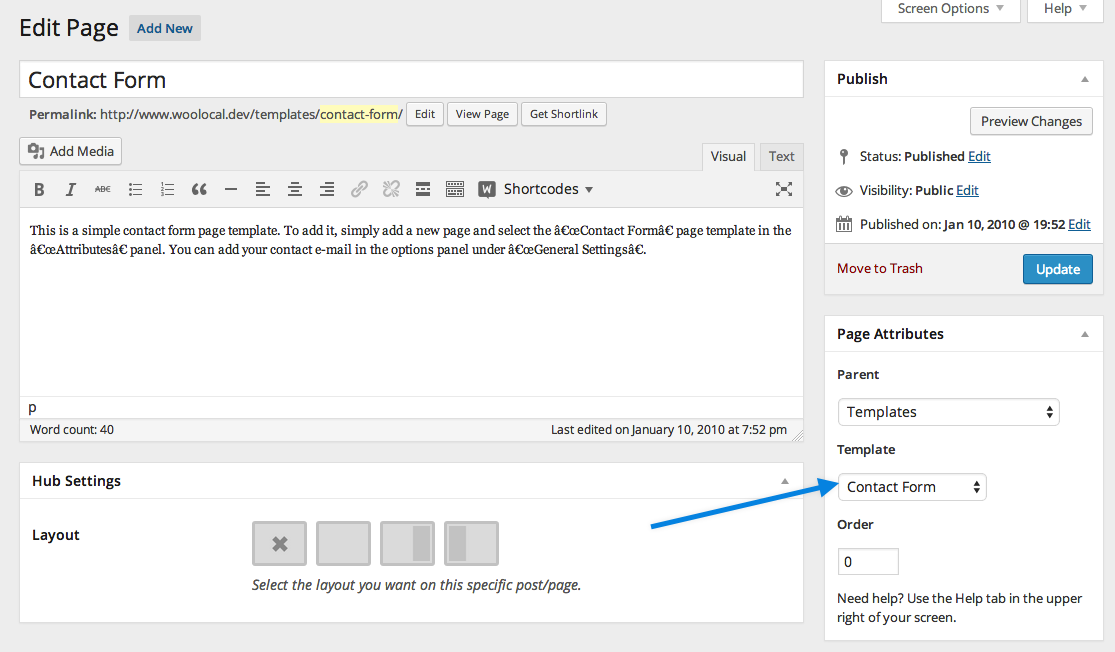
- Go to: Pages > Add New
- Title your Contact Page
- Go to: Page Attributes > Template just below the publish module to select the Contact page template.
- Publish your page.
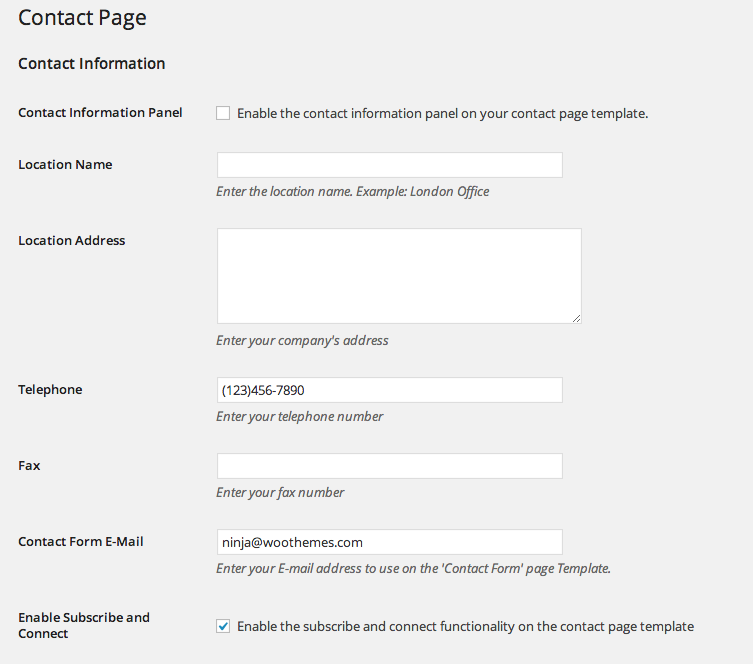
- Go to: Hub > Settings > Contact Page to enter the Contact Form Email address.
- From here you can also enable the information panel (see below), and enable the Subscribe & Connect panel to display your social icons.
- Be sure to Save All Changes when finished.WOOTHEMES HUB WOOCOMMERCE THEMES
To learn more about how Page Templates work please see our video tutorial here: Page Templates
Contact Page Maps
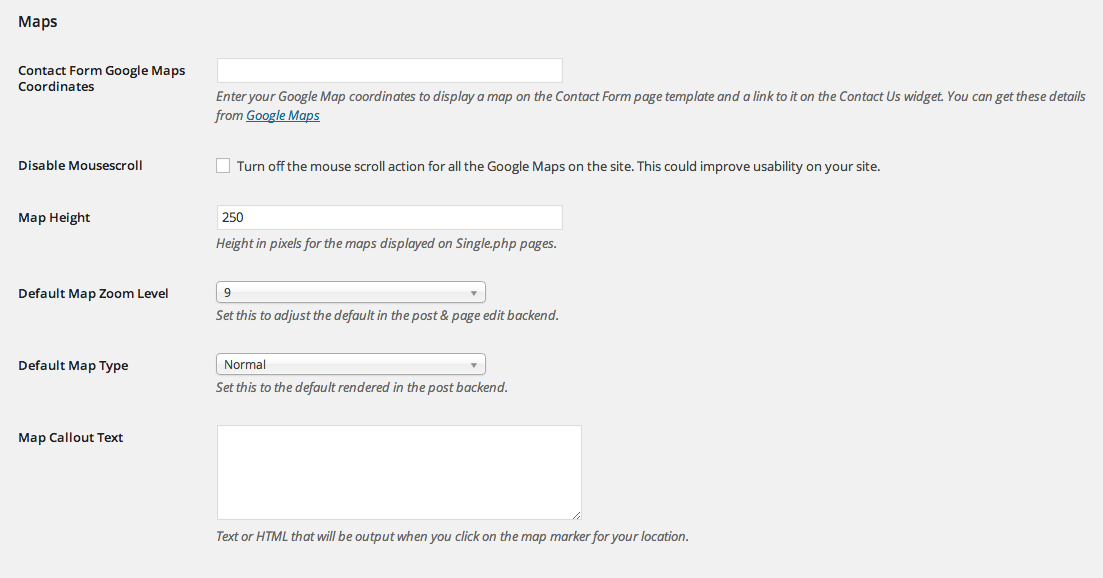
To setup Google Maps:
- Enter your Google Maps coordinates. Example: -33.924868,18.424055 – To find the Google Cordinates, search for your location on a Google Map, right click the pin and select “What’s Here”. This will input the Google Coordinates in the search box.
- Optionally disable mousescroll for all the Google Maps on the site. This could improve usability on your site.
- Set the map height.
- Set the Default Zoom Level.
- Select the Map Type: Normal, Satellite, Hybrid or Terrain.
- Enter Map Callout text to be shown when you click on the map marker for your location.
Custom Hub Widgets
Hub includes 5 custom widgets in addition to the Woo – Component widget mentioned above. Here are the other 5 custom widgets:
- Woo – Adspace
- Woo – Blog Author Info
- Woo – Embed/Video
- Woo – Flickr
- Woo – Subscribe/Connect
To learn more about how to add Widgets please see our tutorial here: How to Add Widgets
Relevant Links
- Installing Your Theme
- How to Update Your Theme
- Download Theme Demo Content
- Theme Options
- Shortcodes
- Menus
- Adding Widgets
- Page Templates
- Features Plugin
- Testimonials Plugin
- Featured Images
- Remove WooThemes Footer Credit
- Edit Theme CSS with Firebug
- Translate your theme
- Using WooThemes Support Resources